The aroma of freshly popped corn, mingled with the sweet and salty allure of kettle corn, is a nostalgic pleasure for many. As a seasoned technician with over a decade of experience in home appliances, especially popcorn makers, I’ve spent countless hours perfecting this classic snack. While traditionally made in a large kettle over an open flame, today’s electric popcorn poppers offer a convenient and equally delicious way to achieve that signature sweet-and-salty crunch right in your kitchen. Forget the store-bought bags; with the right technique and your electric popper, you’re just minutes away from a warm, homemade treat that will delight family and friends. Join me as we unlock the secrets to perfect kettle corn.
Understanding Kettle Corn: A Sweet and Salty Delight
Kettle corn is a beloved popcorn variety renowned for its unique balance of sweet and salty flavors, offering a satisfying crunch with every bite. Unlike traditional savory popcorn, which is often simply buttered and salted, kettle corn incorporates sugar during the popping process, creating a delicate caramelized coating on each kernel. Its origins trace back to 18th-century German and Dutch settlers in America, who prepared it in large cast-iron kettles, giving it its distinctive name. This method allowed the sugar to melt and adhere to the kernels as they popped, resulting in the iconic sweet-and-salty taste and slightly sticky, crispy texture that makes it so irresistible. Its enduring popularity stems from its delightful flavor profile and the simple, wholesome ingredients used to create it.
The Electric Popcorn Popper: Your Kettle Corn Companion
An electric popcorn popper is a convenient kitchen appliance designed to pop popcorn kernels quickly and efficiently. These machines typically feature a heated plate or kettle, often with a stirring arm, that ensures even heat distribution and prevents kernels from burning. For making kettle corn, an oil-based electric popper, sometimes referred to as a “stir-style” popper, is particularly well-suited. The enclosed heating element and consistent stirring mechanism provide an ideal environment for the sugar to melt and caramelize onto the kernels without scorching. This controlled heat and continuous motion are crucial for achieving the perfect balance of sweetness and crunch, making your electric popper an excellent tool for homemade kettle corn.
Essential Ingredients for Perfect Electric Popper Kettle Corn
Crafting the perfect batch of kettle corn in your electric popper starts with selecting quality ingredients. Each component plays a vital role in achieving that coveted sweet and salty flavor with a satisfying crunch.
- Popcorn Kernels: While any good quality popping corn will work, many enthusiasts prefer mushroom kernels. These kernels pop into a rounder, denser shape, which tends to hold the sugar coating better than the more common “butterfly” shaped kernels. Aim for fresh kernels for the best popping rate and texture.
- Oil: The right oil is crucial for both popping the corn and caramelizing the sugar. Coconut oil is a top choice due to its high smoke point and a subtle, pleasant flavor that complements kettle corn. Canola oil or other vegetable oils with high smoke points are also excellent alternatives if coconut oil isn’t preferred or available.
- Sugar: Granulated sugar is the standard for kettle corn. Its fine crystals melt easily and adhere beautifully to the popping kernels. The timing of when you add the sugar is key to preventing burning and ensuring even distribution.
- Salt: A fine-grain salt like table salt, sea salt, or kosher salt is ideal for kettle corn. The finer texture helps it dissolve and stick to the popped corn more effectively, delivering that essential salty counterpoint to the sweetness. Adjust to your taste preferences.
Step-by-Step Guide: Making Kettle Corn in Your Electric Popper
Making kettle corn in an electric popper simplifies the process, allowing you to achieve delicious results with ease. Follow these steps for a perfectly sweet and salty batch.
Preparation is Key
|
Our Picks for the Best Popcorn maker in 2026
As an Amazon Associate I earn from qualifying purchases.
|
||
| Num | Product | Action |
|---|---|---|
| 1 | VEVOR Commercial Popcorn Machine, 8 Oz Kettle, 850 W Countertop Popcorn Maker for 48 Cups per Batch, Theater Style Popper with 3-Switch Control Steel Frame Tempered Glass Doors 2 Scoops 2 Spoons, Red |

|
| 2 | DASH Fresh Pop Popcorn Maker - Oil-Free, Air Popcorn Popper - With Measuring Cup & Recipe Guide - Perfect for Movie Nights - 16 Cups, White |
|
| 3 | DASH Fresh Pop Popcorn Maker - Oil-Free, Air Popcorn Popper - With Measuring Cup & Recipe Guide - Perfect for Movie Nights - 16 Cups, Aqua |
|
| 4 | West Bend Stir Crazy Hot Oil Popcorn Popper, Popcorn Maker Machine with Large Serving Bowl Lid and Stirring Rod Perfect for Movie Night Snack Time or Parties, 6-Quart, Red |
|
| 5 | Presto 04863 Poplite Hot Air Popcorn Popper - Built-In Measuring Cup + Melts Butter, Easy to Clean, Built-In Cord Wrap, 18 Cups, Red |
|
| 6 | Elite Gourmet EPM330M Automatic Stirring 12-cup Popcorn Maker Popper, Hot Oil Popcorn Machine w/Measuring Cap & Built-in Reversible Serving Bowl, Great for Home Party Kids, Safety ETL Approved, Mint |
|
| 7 | Original Whirley Pop Popcorn Machine – 3-Minute Stovetop Popcorn Maker for Home Movie Snacks & Game Night – Wabash Valley Farms – Aluminum Pot With Nylon Gears – (Silver) |
|
| 8 | Elite Gourmet EPM145M 18-cup Hot Oil Stirring Popcorn Popper w/Measuring Cap & Reversible Serving Bowl & Butter Melting Tray, Great for Parties, Movie Night, Anytime Snack, Safety ETL Approved, Mint |
|
| 9 | Ecolution Patented Micro-Pop Microwave Popcorn Popper with Temperature Safe Glass, 3-in-1 Lid Measures Kernels and Melts Butter, Made Without BPA, Dishwasher Safe, 3-Quart, Red |
|
| 10 | West Bend Stir Crazy Movie Theater Popcorn Popper, Gourmet Popcorn Maker Machine with Nonstick Popcorn Kettle, Measuring Tool and Popcorn Scoop for Popcorn Machine, 4 Qt., Black |
|
Before you even turn on your popper, gather all your ingredients and equipment. This ensures a smooth, uninterrupted process, which is critical when working with sugar to prevent burning. Measure your popcorn kernels, oil, sugar, and salt precisely. Have a large bowl ready for the popped corn and a spatula or spoon for any necessary stirring if your machine allows manual assistance, or for immediate transfer. For electric poppers that don’t have a preheat setting or a non-stick coating, some recipes suggest a light spray of non-stick lecithin to help prevent sugar from sticking.
The Popping Process
- Add Ingredients: For most oil-based electric poppers with a stirring mechanism, you can typically add all the core ingredients at once. Pour your chosen oil into the popping chamber, followed by the popcorn kernels and then the granulated sugar. Some commercial-style machines may suggest a slight preheat with oil before adding kernels and sugar once the oil shimmers. For home electric poppers, adding all three together and then turning the machine on works well to allow the sugar to melt gradually as the oil heats.
- Start Popping: Close the lid and turn on your electric popper to its “Pop” setting. The internal stirring arm will begin to agitate the kernels and sugar evenly in the heated oil.
- Monitor and Listen: As the kernels heat up, the sugar will start to melt and caramelize. Keep an ear out for the popping sounds. Initially, the pops will be sporadic, then become more frequent. Continue popping until the sounds slow down to about 2-3 seconds between pops. This is the crucial moment to prevent the sugar from burning. Do not rely solely on an automatic shut-off or a “beeper” if your machine has one, as these might not account for the sugar’s caramelization time.
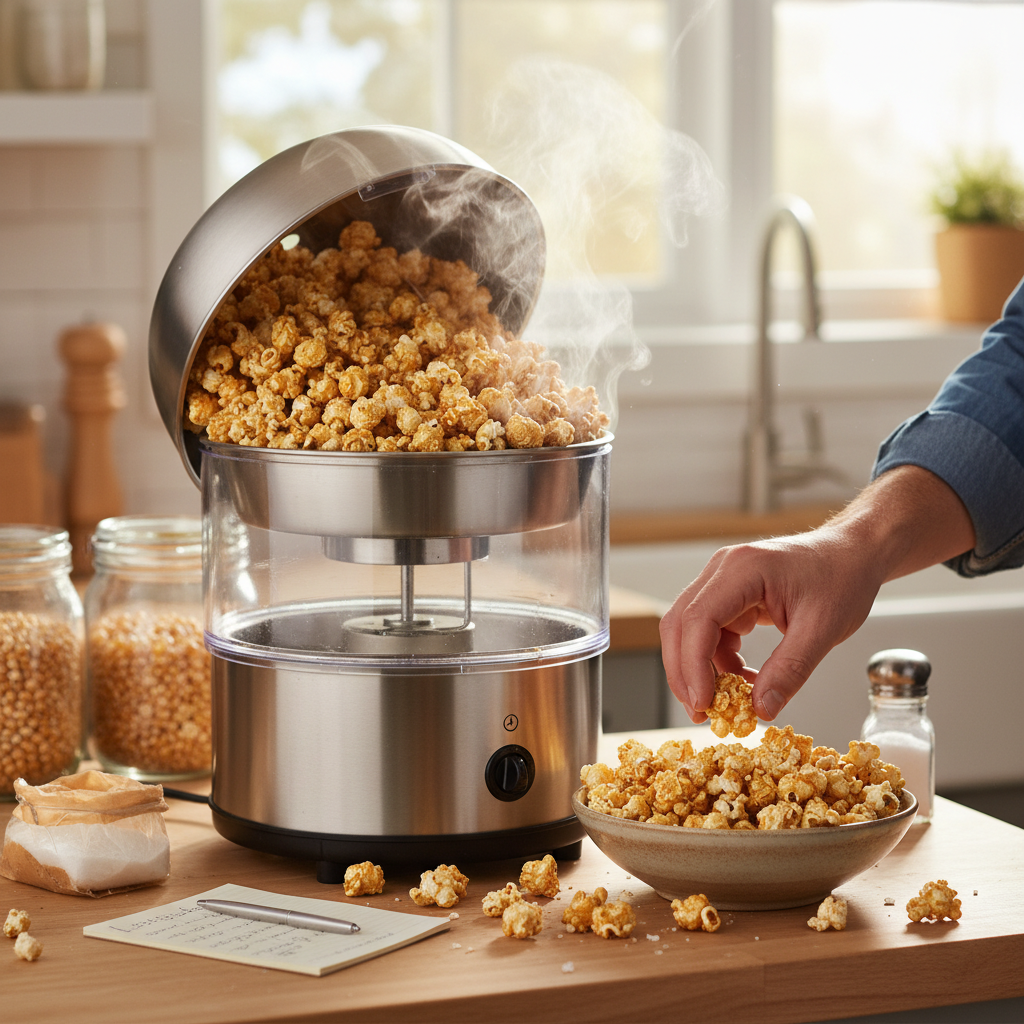
- Immediate Transfer: As soon as the popping rate significantly slows, or you notice the distinct aroma of toasted sugar, immediately turn off the popper and carefully dump the hot kettle corn into your large waiting bowl. This rapid transfer prevents residual heat from burning the delicate sugar coating.
The Salt Finish
Once the kettle corn is in the bowl, immediately sprinkle your fine-grain salt evenly over the warm popcorn. Gently toss or stir the popcorn to ensure the salt adheres to the caramelized sugar and distributes throughout the batch. The warmth of the freshly popped corn will help the salt stick. Taste and adjust saltiness if desired. Serve immediately and enjoy the perfect balance of sweet and savory!
Tips and Tricks for Kettle Corn Success
Achieving perfect kettle corn in your electric popper can be a delicate dance between heat, sugar, and timing. Here are some expert tips to ensure success every time:
- Preventing Burnt Sugar: This is perhaps the biggest challenge with kettle corn. The key is constant agitation and timely removal. Ensure your electric popper’s stirring arm is functioning correctly. As mentioned, dump the corn immediately once popping slows significantly. If your popper allows, a slightly lower temperature (around 475-525°F) can provide more leeway for the sugar to melt and coat without burning, compared to the higher temperatures some machines use for plain popcorn.
- Achieving Maximum Crunch: For that ideal crispy texture, ensure all moisture is allowed to escape during popping. Most electric poppers have vents in their lids; make sure they are clear. After dumping, avoid covering the popcorn immediately, as steam can soften the coating. Let it cool for a few minutes in an open bowl to crisp up further.
- Adjusting Sweetness/Saltiness: The standard ratio of sugar and salt is a good starting point, but feel free to experiment. If you prefer it sweeter, add a touch more sugar to the popping batch. For more salt, sprinkle extra after popping. Remember that sugar content can increase the risk of burning, so adjust gradually.
- Troubleshooting Common Issues:
- Unpopped Kernels: If you have too many “old maids,” your kernels might be stale, or the popper might not be reaching an optimal temperature. Ensure kernels are fresh and the oil is sufficiently heated.
- Soggy Corn: This often indicates too much steam trapped during popping. Check lid vents and ensure you transfer the popcorn quickly to an open bowl after popping.
- Sugar Sticking to the Popper: This is common. Regular cleaning is essential. For machines with removable kettles, ensure they are thoroughly cleaned after each use. A non-stick coating or a light spray before adding ingredients can help. Some commercial poppers even recommend a non-stick lecithin spray specifically for this purpose.
Comparing Electric Popper Kettle Corn to Other Methods
While the electric popper offers a fantastic balance of convenience and quality for kettle corn, it’s helpful to understand how it stacks up against other popular popping methods.
Stovetop Kettle Corn
- Pros: Offers the most control over heat, stirring, and timing, allowing for highly customized results. Often achieves a very authentic, even coating.
- Cons: Requires constant attention and vigorous shaking or stirring. Can be more prone to burnt sugar if not carefully monitored. Clean-up can be more challenging with a heavy pot.
- Key Differences: The hands-on nature of stovetop popping contrasts with the semi-automated process of an electric popper. Electric poppers with stirrers mimic the manual agitation, reducing the effort needed.
Air Popper Kettle Corn
- Pros: Healthier as it uses no oil for popping, resulting in lower calories. Quick and easy cleanup for the popper itself.
- Cons: Not suitable for true kettle corn during the popping process. Sugar cannot caramelize effectively without oil and direct heat.
- Challenges and Solutions: To make “kettle corn” with an air popper, you must pop the corn plain and then toss it with a pre-made sweet and salty mixture (e.g., melted butter, sugar, and salt) or a sugar syrup, which often results in a different texture and flavor profile compared to sugar caramelizing on the kernel during popping.
An oil-based electric popper strikes an excellent balance, offering much of the control and authentic result of stovetop methods with greater ease and less hands-on effort.
Choosing the Right Electric Popper for Kettle Corn
Selecting the ideal electric popcorn popper can significantly impact your kettle corn experience. Consider these criteria to find the perfect match for your needs:
- Power and Speed: A popper with adequate wattage (typically 800-1500 watts) will heat up quickly and maintain a consistent temperature, which is vital for efficient popping and proper sugar caramelization. Faster popping times reduce the chance of sugar burning.
- Capacity: Electric poppers come in various sizes, from small countertop models (producing 6-8 cups) to larger family-sized units (yielding 16+ cups). Choose a capacity that matches your typical serving size to avoid making multiple batches or having too much leftover.
- Stirring Mechanism: For kettle corn, a built-in stirring arm is almost essential. This continuous agitation ensures kernels are evenly coated with oil and sugar, preventing the sugar from settling and burning at the bottom of the kettle. Without it, manual shaking would be required, which can be difficult with many electric designs.
- Non-Stick Surface: A good quality non-stick popping surface is a game-changer for kettle corn. Sugar tends to stick and burn, so a non-stick coating makes both popping and, more importantly, cleaning much easier.
- Ease of Cleaning: Beyond non-stick surfaces, look for models with removable parts (like the popping plate or stirring arm) that are dishwasher-safe or easy to hand wash. The caramelized sugar can be tough to remove if left to harden.
- Safety Features: Overheat protection and sturdy construction are important. Look for cool-touch handles and clear lids that allow you to monitor the popping process safely.
- Brand and Price: Reputable brands often offer better durability and customer support. While electric poppers vary widely in price, you can find excellent models across different budget points. Investing a bit more in a model with a good non-stick surface and efficient stirring mechanism will pay off in consistent kettle corn results and easier maintenance.
Top 3 Electric Poppers for Kettle Corn
While specific models change frequently, here are categories of highly-rated electric poppers that excel at making kettle corn, based on their features and common consumer feedback:
- Stir-Style Popcorn Makers (e.g., Presto PopLite Plus Stirring Popper, West Bend Stir Crazy): These classic electric poppers feature a heated plate and a motorized stirring rod that continuously moves kernels and oil. Their consistent agitation is perfect for evenly distributing sugar and preventing it from burning, making them ideal for kettle corn. Many also boast non-stick surfaces and easy-to-clean components.
- Electric Kettle Popcorn Machines (e.g., Nostalgia Vintage Popcorn Cart, Great Northern Popcorn): These resemble miniature versions of commercial cinema poppers, with a suspended stainless steel kettle. The kettle itself typically has a stirring mechanism. Their enclosed, direct heat environment and effective stirring are excellent for producing authentic kettle corn, especially in larger batches. Look for models with a non-stick coated kettle.
- Flat-Base Stirring Poppers with Vented Lids (e.g., some Cuisinart models): Certain electric poppers combine a heated flat base with a stirring arm and a large, domed, vented lid. These are great because the flat base often offers a wider area for sugar to melt, and the stirring ensures coverage. The vented lid is crucial for steam release, contributing to crispy kettle corn.
When choosing, prioritize models that explicitly mention a stirring mechanism and easy-to-clean, preferably non-stick, popping surfaces for the best kettle corn experience.
Instructions for Use and Maintenance of Your Electric Popper
To ensure your electric popcorn popper consistently delivers delicious kettle corn and lasts for years, proper usage and maintenance are key.
Safe and Effective Use
- Read Your Manual: Always begin by reading the manufacturer’s instructions specific to your model. This will provide precise guidance on capacity, safety features, and cleaning.
- Proper Ingredient Ratios: Stick to the recommended ratios of kernels, oil, and sugar. Overfilling can lead to uneven popping, burnt sugar, or even overflow.
- Preheating (If Applicable): Some commercial-style electric poppers benefit from a brief preheat with oil before adding kernels and sugar. For most home stir-style poppers, adding all ingredients simultaneously to a cold machine is effective.
- Monitor Closely: Especially with kettle corn, stay near your popper. Listen for the popping rate to slow down (typically 2-3 seconds between pops). This is your cue to immediately turn off the machine and empty the kettle to prevent sugar from burning.
- Immediate Transfer: Once popping is complete, carefully and quickly dump the hot kettle corn into a large bowl. This prevents the sugar from continuing to cook and burn on the hot surface.
- Salt After Popping: Sprinkle salt over the hot, freshly popped kettle corn and toss gently to ensure even distribution.
Cleaning and Storage
- Unplug First: Always unplug the popper and allow it to cool completely before cleaning. This is crucial for safety.
- Remove Popcorn: Dump any remaining popcorn from the popping chamber.
- Clean Popping Surface: For non-stick surfaces, use a soft cloth or sponge with warm, soapy water. Avoid abrasive scrubbers or harsh detergents, which can damage the non-stick coating. For stubborn, stuck-on sugar, a non-abrasive plastic scraper can be helpful. A mixture of warm water and a little dish soap allowed to soak for 10-15 minutes can also help loosen burnt sugar before scrubbing.
- Wash Removable Parts: If your popper has removable stirring arms, lids, or other components, wash them according to the manufacturer’s instructions. Many are dishwasher-safe.
- Wipe Exterior: Wipe down the exterior of the popper with a damp cloth. Never immerse the electrical base unit in water.
- Thorough Drying: Ensure all parts are completely dry before reassembling and storing to prevent rust or mildew.
- Storage: Store your electric popper in a clean, dry place. Proper storage helps maintain its condition and prolongs its lifespan.
By following these guidelines, you’ll be able to enjoy perfectly made kettle corn and keep your electric popper in excellent working order for many years to come.
Conclusion
Making delicious kettle corn in your electric popper is a rewarding experience that brings the carnival classic right into your home. By understanding the key ingredients and mastering the step-by-step process—especially the crucial timing of sugar addition and quick removal—you can consistently achieve that coveted sweet and salty crunch. Remember that an oil-based electric popper with a stirring mechanism is your best friend for this task, ensuring even caramelization and preventing burnt sugar. With a little practice, your electric popper will become an indispensable tool for crafting this delightful snack, perfectly balancing convenience with authentic flavor. So, gather your kernels, oil, sugar, and salt, and get ready to enjoy a treat that truly satisfies every craving. What will be your go-to occasion for popping up a batch of homemade kettle corn?
Câu Hỏi Thường Gặp
What type of oil is best for kettle corn in an electric popper?
Coconut oil is highly recommended for kettle corn due to its high smoke point and a subtle flavor that enhances the popcorn. Canola oil or other high-heat vegetable oils are also excellent alternatives for consistent results.
Can I use powdered sugar instead of granulated sugar?
It’s generally not recommended to use powdered sugar for kettle corn made in an electric popper. Powdered sugar contains cornstarch or other anti-caking agents that can interfere with the caramelization process, leading to a less crispy coating and potentially a gummy texture. Granulated sugar melts and adheres much more effectively.
How do I prevent the sugar from burning and sticking to the popper?
To prevent burning and sticking, it’s crucial to have a popper with a good stirring mechanism and a non-stick surface. Additionally, make sure to add the sugar at the right time (usually along with the kernels and oil at the start) and, most importantly, immediately dump the kettle corn into a separate bowl as soon as the popping significantly slows down.
My kettle corn isn’t sweet enough, what did I do wrong?
If your kettle corn isn’t sweet enough, you might need to increase the amount of sugar slightly in your recipe. Ensure the sugar is added at the beginning of the popping process so it has enough time to melt and coat the kernels. Also, check that your popper is reaching an optimal temperature to fully caramelize the sugar.
Is it possible to make healthy kettle corn in an electric popper?
While traditional kettle corn contains sugar, you can make healthier versions. Use less oil or a healthier oil option, and reduce the amount of granulated sugar. You can also experiment with natural sweeteners like a small amount of maple syrup (added after popping) or substitute some sugar with spices like cinnamon for added flavor without extra sweetness.